The criteria for inclusion of a game in my list is specified in Part I.
All in all, 2018 seems to be an interesting year for RPG and tactic gamers – more so than 2016, and even 2017. What awaits us in the coming months?
The criteria for inclusion of a game in my list is specified in Part I.
All in all, 2018 seems to be an interesting year for RPG and tactic gamers – more so than 2016, and even 2017. What awaits us in the coming months?
I decided to post my yearly overview of released and upcoming RPGs and tactics in English this time. Some explanations before I proceed further.
This list will only included games released, or announced for 2018, and only those games that I consider to be of interest to me. This means it mostly consist of turn-based and/or isometric RPGs and tactics, though sometimes I make exceptions for high-profile games or titles I consider to be interesting because of something else. However, there will be almost no mentions of non-tactical JRPGs, as I’m completely uninterested in the genre and can’t provide any comments on it, as well as most action-RPGs, including AAA titles. Oh, yeah, and the list is text-only, but with links to game’s site, for the sake of brevity.
Projects that I consider to be the most interesting are marked with ☆ sign.
With that in mind, let’s recount what titles have already been released in 2018 at this point.
Continue reading
An article about the development of Return of Dr. Destructo is now up at Edamame.
A few of my colleagues and me decided to try our hand at creating an RPG. Now, this is a long process, and we’re presently at the very beginning, and none of us are experienced game designers. So the only way to go is to prototype, iterate and playtest.
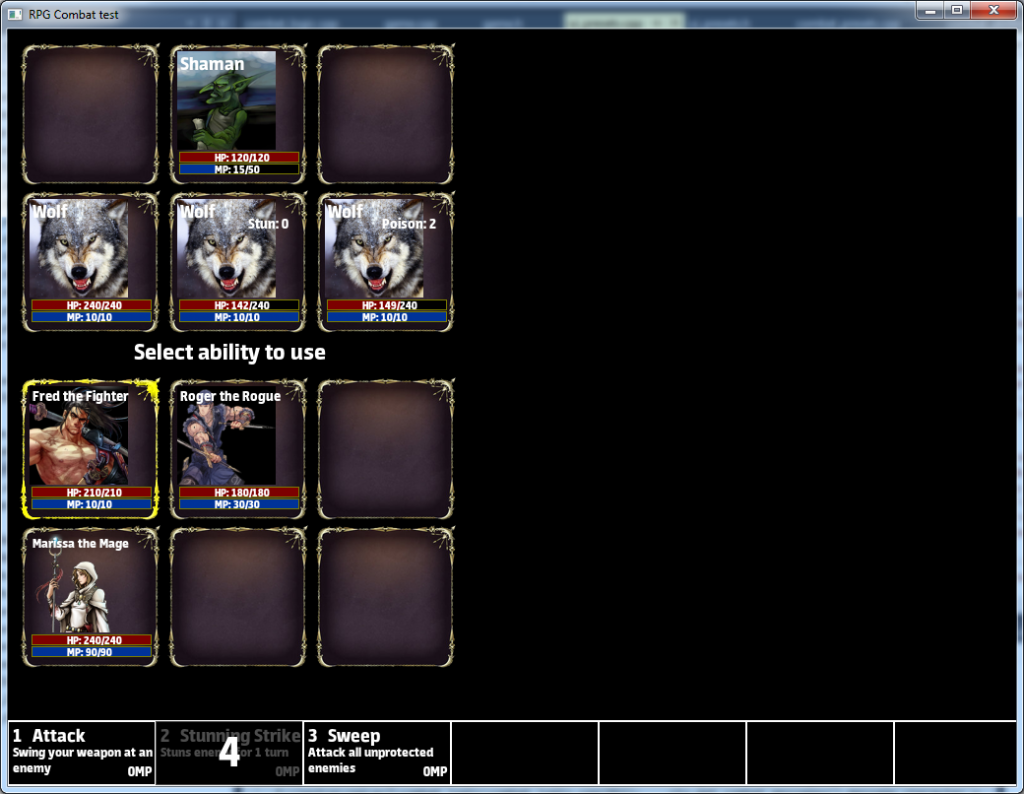
Today, I invite you to test a combat system for this RPG. It looks a lot like JRPG/Dungeo Crawler combat, but I tried to make it a bit different from the usual fare in these genres, by putting emphasis on difficulty of each combat, instead of dungeon (a sequence of combats) as a whole. So, health and mana of all characters are fully restored after each battle, like in many modern western games.
The test is quite simple: you have to fight 5 battles of increasing difficulty until you defeat a boss. This should take less then an hour, I believe (and so there are no save/loads). I’ve been working on this for some weeks in the evenings, so don’t expect much of it, especially visually, but I think it should be playable enough for more-or-less experienced players now. The test is programmed in C++, but is compiled for web via Emscripten.
I welcome all feedback you can give: what did you like, what frustrated you, what was funny etc. Please do not hesitate to write a comment to this post, or drop me a line by e-mail.
More than year has passed since the release of Return of Dr. Destructo, my remake of ZX Spectrum arcade Island of Dr. Destructo. Soon, the work began on the mobile version of the game, but I only finished it now. Go ahead, and give it a try if you own an Android phone or tablet!
Download Return of Dr. Destructo Android for Google Play
What’s new since the desktop release (besides the necessary adaptations to make the game playable on mobiles):
1) Planes now have super-weapons, including powerful bomb, bullet spray, mines and the ability to freeze enemies.
2) 5 new planes! Each with its own look, speed, turn rate and super-weapon
3) Tutorial to make things smoother for new players. Hopefully, this will do away with the confusion some players felt about the goal of the game.
I also have some further plans for this game, but I’m not ready to announce them yet, as I want to see if there is any interest in it first. Google Play no longer gives you any organic traffic, as the new games do not appear anywhere in the store, so I’ll have to fight tooth and nail for every player.
 In games with complex UI, creating a library that supports that UI and tools that allow designers quickly iterate changes could be a daunting and a time-consuming task. A task that you’d like to solve once and forever, and not write a new solution for each new project, or even for each new company you work at. Life, as it can be said, is too short to roll your own UI libraries!
So, in desperation, you begin to search for a third-party universal UI library. Once, this was the domain of CEGui and the like, but the current generation of game-specific UI frameworks is dominated by Scaleform and Coherent UI. Although, if HTML-based UI is what you want, you may simply choose Awesomium.
Unfortunately, this trio has some problems with performance, especially apparent on mobile devices. Just a few years ago, I’ve seen a nearly empty screen rendered with Scaleform take up 50% of frame time on iPhone4.
So, I always wondered why does no one use Qt for game UI – a library that is well known for being one of the less-fucked-up UI toolkits for desktop applications. This is not actually entirely true – a list on Qt Project Wiki has some games that do use it, but it’s mostly open source, small-time projects or ports of old games.
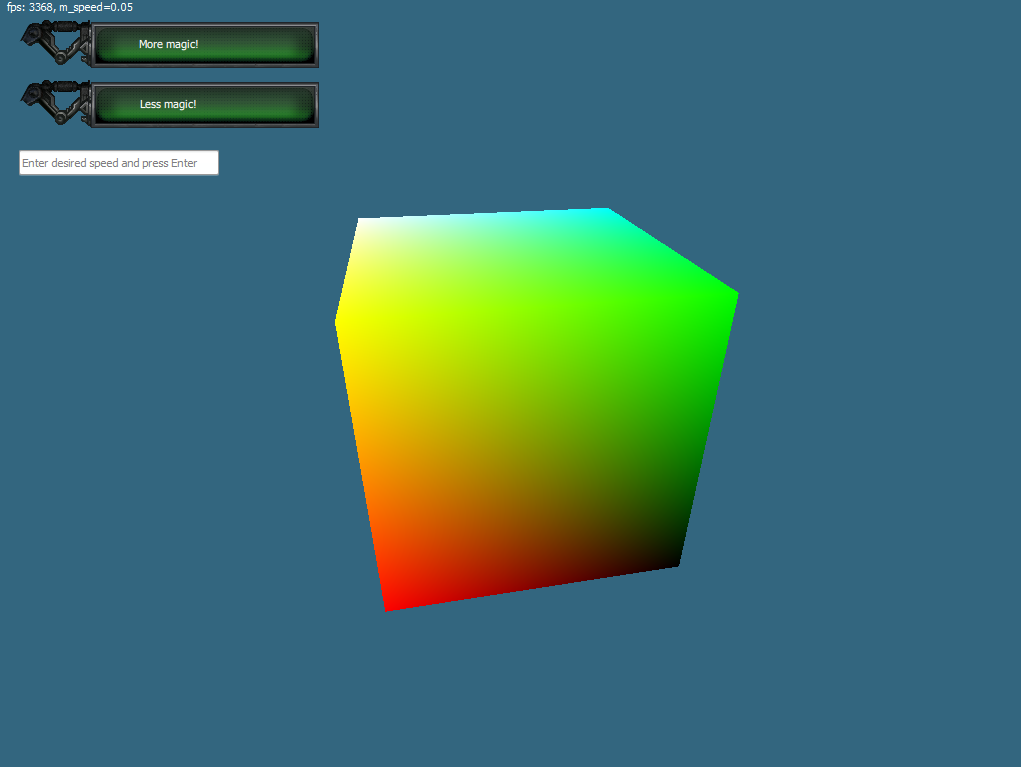
Of course, it’s obvious why you wouldn’t use Qt Desktop Widgets in a game. They are not at all suited for hardware-accelerated rendering, and while you may try to work around this problem, it’s far more troubles than its worth. However, for a long time, Qt had a different library, the one that allows drawing hardware-accelerated widgets: QtQuick.
Not only it is said to be specifically targeted at mobile devices, it also has a very nice text format for describing UI screens, which is well-suited for quick iteration.
Still, I have never yet heard of a professional game developer using QtQuick. As I could find no posts or articles that could give me the reason for this, I just had to check it out for myself.
Continue reading

It’s been a while since I bought myself a Meizu MX4 Ubuntu Edition phone, but I finally found time and motivation to learn more about this new mobile platform from Canonical. I chose to port Allegro game library and my pet project, Return of Dr. Destructo, which is presently also nearing release on iOS and Android as a commercial app, to that platform. This post, however, won’t be very specific to my own projects, but can be used as a general set of answers to some problems with Ubuntu Touch-targeted development of OpenGL apps.
The worst thing about developing for a new platform is lack of coherent documentation. Even Windows Phone, with MSDN and Microsoft’s large workforce had this problem in the beginning, as it was impossible to google answers to even the simplest questions. In this post, I will try do document some peculiarities, problems and solutions of developing an OpenGL application (namely, a game) for Ubuntu Touch. If you’re more interested in developing apps with native UI (QML, QtQuick), then it will be slightly less useful to you, but you may still find something here.
Usually, having price as a double value is a very bad mistake. However, in some cases this is necessary, for example when your analytic system requires it, like Amazon Mobile Analytic does. Both Android and iOS provide you with a way to get that information, but Windows (Phone) Store only gives you FormattedPrice string.
And obvious way to get price value from it is to use CurrencyFormatter class provided by Microsoft. However, things are not quite that simple. The biggest question is which locale Store used to create FormattedPrice for you. The answer is a little complicated. It pulls currency (and its symbol) from one place, but it takes formatting (including placement of currency symbol relative to value and thousands separator) from another.
If you create CurrencyFormatter with only currency identifier, it will not be able to parse FormattedPrice in all cases, when user have set different regional settings in different places (for example, if he uses USA store with USD as currency, but his price formatting is done in British style) or if he set up some custom formatting.
So instead we need to use the second constructor. It takes a list of languages, and ID of geographical region. It might not be obvious how it can help our cause, but actually specifying this information allows CurrencyFormatter to pull formatting properties set up for user’s language and use them instead of defaults. However, exactly how it does it is not clear from documentation. Our own testing showed that the last parameter (geographical region ID) does not matter – you can always pass in “US”, but the key is to pass user’s language as the second parameter. Take this with a grain of salt, please: until we know the third parameter NEVER does affect parsing, we need to be cautious about it…
The only remaining question is how to get the locale used by Store. The only answer I found works only in C++ using old WinAPI functions, so it’s only relevant for those who target desktop Windows, or Windows Phone 8.1+ and use C++ to interact with Store. Fortunately, that’s just what we do at work 🙂 So, here’s the final code to get price value from FormattedPrice in Windows Store in C++:
// Assuming we're in LoadListingInformationByProductIdsAsync handler
// and just successfully received ListingInformation
ApplicationModel::Store::ListingInformation^ listInfo = operation->GetResults();

// This gets us currency ID used by store, but language settings used for formatting
Windows::Globalization::GeographicRegion^ geographicRegion
    = ref new Windows::Globalization::GeographicRegion(listInfo->CurrentMarket);
Platform::String^ currencyID = geographicRegion->CurrenciesInUse->GetAt(0);

// Now, some WinAPI magic: get us user's default locale, which is used by Store to format things
WCHAR wcBuffer[10];
GetUserDefaultLocaleName(wcBuffer, 10);
Platform::String^ userFormatLocale = ref new Platform::String(wcBuffer);

// Use locale returned by GetUserDefaultLocaleName to populate
// a list of languages for CurrencyFormatter
Platform::Collections::Vector<Platform::String^>^ v
    = ref new Platform::Collections::Vector<Platform::String^>();
v->Append(userFormatLocale);

// Create CurrencyFormatter using the second form of constructor.
// Please note that I'm NOT sure about meaning of the 3rd parameter!
Windows::Globalization::NumberFormatting::CurrencyFormatter^ formatter
   = ref new Windows::Globalization::NumberFormatting::CurrencyFormatter(currencyID,
         v, ref new Platform::String(L"US"));

// Iterate over products in listInfo
for (auto iter : listInfo->ProductListings)
{
    ApplicationModel::Store::ProductListing^ store_product = iter->Value;

    // Use formatter to parse currency value into double.
    // A Decimal might be preferable for anything serious, but for statistics it will have to do
    Platform::IBox<double>^ result = formatter->ParseDouble(store_product->FormattedPrice);

    // In case formatter failed to parse the price, to a check
    double price = result == nullptr ? 0.0f : result->Value;
}
There you have it. This solution is not without magic components which may fail, but it seems to work in most cases. Please remember, that you DON’T need this most of the time – a price representation in string format should suffice for almost ANY case! But if you really, really need to parse FormattedPrice into double value – there you have it.
We disabled texture atlases.
Continue reading
Since Google hates C++ developers and still haven’t finalized NDK support in Android Studio, we at Lextre call ndk-build manually, by using task( type: Exec ) in Gradle. However, we need to pass some parameters to it. For example, different build variants must use different output directories for object files, and we also need to set various flags depending on whether we are building debug or shipping configuration.
In general, it seems to be useful to know how to parametrize tasks based on chosen build variant (which is a combination of build configuration and product flavor).
The obvious solution – to create some variables in build.gradle and use them in task’s body – won’t work, because variables are computed and substituted during configuration step, while we only know the chosen build variant in build step.
The second obvious solution is to use project properties, which you can specify via -P key when running Gradle from command line. However, this is very inconvenient: we already specify build variant, which should tell Gradle everything it needs to know. Also, it would make building from Android Studio harder, if no impossible.
The problem is that the task’s configuration is immutable after the configuration step is complete. So, the solution is to have a different task for every build variant, each with its own configuration! Of course, to write them all by hand is a thing no sane person should do, especially as the number of build variants grow very fast with each added configuration or product flavor. Therefore, we need to automate task creation.
Gradle has a mechanism for that: Rules. Unfortunately, I haven’t managed to get it working. On the other hand, it looks pretty much the same as the solution I finally devised.
So, instead of Rules, I do this: Gradle allows you to iterate over the set of already-present tasks. I use this feature to find all tasks that compile a concrete build variant, and create a new task with an unique name and configuration, than make the old task depend on the new one. Without further delays, here’s the code:
tasks.withType(JavaCompile) {
        compileTask ->
              // NDK task name
            def ndkBuildTaskName = "ndkBuild_" + compileTask.name

              // NDK task parameters
            def obj_dir = "../../build/ndk/";
            def debug = 0;
            def shipping = 0;
            def km = 0;

              // Parse build configuration. If it's an umbrella task (which includes several configurations), skip it
            if ( compileTask.name.contains("Debug") )
            {
                obj_dir += "obj_debug";
                debug = 1;
            }
            else if ( compileTask.name.contains("Release") )
                obj_dir += "obj_release";
            else if ( compileTask.name.contains("Shipping") )
            {
                obj_dir += "obj_shipping";
                shipping = 1;
            }
            else
                return;

              // Parse product flavor. If there isn't one, skip this task
            if ( compileTask.name.contains("Google") )
                obj_dir += "_google";
            else if ( compileTask.name.contains("Amazon") )
                obj_dir += "_amazon";
            else if ( compileTask.name.contains("Km") )
            {
                obj_dir += "_km";
                km = 1;
            }
            else
                return;

              // Create a new NDK task with specified name
            tasks.create( ndkBuildTaskName, Exec ) {
                  // Set parameters to be used in Android.mk
                if ( shipping == 1 )
                    environment( "SHIPPING", "-DSHIPPING" );
                if ( debug == 1 )
                    environment( "DEBUG", "1" );
                if ( km == 1 )
                    environment( "PS_RU", "-DPS_RU" );

                  // Enable maximum safe number of cores for parallel builds
                int cores = Runtime.getRuntime().availableProcessors();
                int ndkThreads = cores > 1 ? cores - 1 : 1;
                if ( project.hasProperty('NDK_THREADS') ) {
                    ndkThreads = Integer.parseInt(NDK_THREADS)
                }

                  // Find ndk-build command
                def ndkRun = 'ndk-build'
                if ( project.hasProperty('NDK_RUN') ) {
                    assert file(NDK_RUN).exists()
                    ndkRun = NDK_RUN
                } else if (Os.isFamily(Os.FAMILY_WINDOWS)) {
                    ndkRun += '.cmd'
                }

                  // Run ndk-build. We have our .mk files in src/main/jni, but you may have them in some other location
                  // NDK_OUT specifies directory for object files. If not specified, it will always be 'obj'
                  // and it will break debug/release/shipping switch
                commandLine ndkRun, '--jobs', ndkThreads, '-C', file('src/main').absolutePath, "NDK_OUT=$obj_dir"
            }

              // Make java compilation task depend on newly created task
            compileTask.dependsOn ndkBuildTaskName
    }
I’ll be the first to admit that this might not be the most elegant solution, but still, it works and it’s flexible enough. If you know a better way to solve this problem, I urge you to share it in comments, because I searched Google in vain for one before, and haven’t found anything.